We use cookies to make your experience better.
To comply with the new e-Privacy directive, you agree to the privacy policy and our use of cookies.
Now You Are A Vendor Start selling Your STL Designs
January 23, 2023

Start Making Money From Your 3D Models Now
Once you have set up your store and your payment information then you are ready to start listing your STL designs on our website.
Firstly prepare your models and your media.
Ensure that all of your models STL files have been named correctly and that the models have been run through 3D Builder, had any repairs done and are oriented in the correct position for printing.
Following these steps will ensure that your customers are happy with your models and result in more sales.
To make the downloads easier for customers we only accept zip files as file uploads, so please ensure you have all of the models STL files and any images or included licensing information included in the ZIP file and it is named to show the model it contains clearly.
Please see the video about preparing your files for retailing and if you are interested in making your models the best they can be we have many more videos on our modelling tutorial playlist.
Once you have prepared your files, make sure your products are rendered & photographed.
Once you have your files prepared you want to make sure your products are rendered and photographed.
People will be choosing your model based on your media so it is important to make it good.
Firstly a good looking rednder is important as it gives you a chance to show of the model in its digital form and best light.
Secondly people want to know it is printable and has been test printed. So with that in mind the best way to show this is to take some photos of the printed model, this does not have to be painted but a painted version can help aswell.
For the website we use JPG images that are 600px x 600px and try to keep the file size below 50KB to retain a good loading speed.
run any images through https://png2jpg.com/ and then compress them using https://compressjpeg.com/
If you want to learn more about making a render for your product them we have a video for that.
Now you are ready to start listing your models
To get started select 'Add Downloadablel Product' from the left menu from your vendor dashboard. On the product listing screen, firstly you will see a series of options appear on the page, while they may look overwhelming. Don't Panic
- Enable Product - This switch allows you to control if the product is live or not.
- Attribute Set - The only set available to you is STL Product.
- Product Name - Give your product a name, not too long but accurate.
- SKU - This is a store identifier, this will auto fill as you list but you can edit it.
- Price - The final price in GBP for the product, ycan put your product on sale for Free (£0.00) or greater than £1.50.
Advanced pricing allows you to set a discount price if you want to put your item on sale for a perios of time. - Category - here you can select the categories your product will be shown in. ONLY CHOOSE categories that are relevant to your product, For normal models make sur eyou choose STL then any sub categories that suit. Only choose bundle pack if you have put many STL listings worth of files together.
- Product Brand - Your Name will be added to the list for you to self brand your products or you can select 'unbranded'
- Supports - Choose if the design is for no supports, supports recomended or supports required.
- Genre - Choose the setting your model will fit into.
- Use - This is a multiple select box so you can hold CTRL and select as many options that apply to your model as you need, this is used in catalogue sorting.
- Vehicle Type - If you are uploading a vehicle then select its type here.

The next drop down section is 'Content' and contains two input fields.
- Short Description - This is a place to write a short intro to what your product is, it appears next to the image gallery and above the add to cart button on the product page.
- Description - This is the main description and allows html or rich text input. Add a title (but dont use heading 1) give a description of the model, give it a reason to exist, outline what type of printer it is for, give its dimensions and anything else you can think is worth including. You can look at our listings for more ideas.
Next up is the images drop down
In here you can drag and drop your images or click on the box and select the files on your hard drive.
Once they have uploaded you can then re-order them so people see them in the order you want.
You can also add a video by clicking the 'Add Video' button, this allows you to link to a youtube video in the popup window.
Once your images are uploaded you need to make two selections.
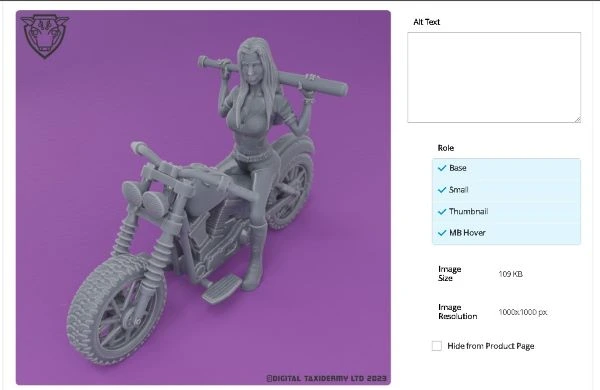
Click on your main product image and on the pop-up select the options 'base' (the first image shown in the gallery) and 'Small' (this is the image first shown in the catalogue.
Then you select the next promo image and in the popup you need to select 'Thumbnail' and 'MB Hover' this will alllow you to have an image that swaps with the main image in the catalogue when someone mouses over it.
In here you can drag and drop your images or click on the box and select the files on your hard drive.
Once they have uploaded you can then re-order them so people see them in the order you want.
You can also add a video by clicking the 'Add Video' button, this allows you to link to a youtube video in the popup window.
Once your images are uploaded you need to make two selections.
Click on your main product image and on the pop-up select the options 'base' (the first image shown in the gallery) and 'Small' (this is the image first shown in the catalogue.
Then you select the next promo image and in the popup you need to select 'Thumbnail' and 'MB Hover' this will alllow you to have an image that swaps with the main image in the catalogue when someone mouses over it.
Search Engine Optimization is your chance to fill out the details that will help your product be found on google when people search.
The sections here need to have relevant words that describe your product. Think 'if you didn't know what this is, how would you find it'.
The sections here need to have relevant words that describe your product. Think 'if you didn't know what this is, how would you find it'.
- URL Key - this is the page name for your listing, keep it short and descriptive but DO NOT use capitals or spaces.
- Meta Title - This auto fills with your product name and some standard text, this can be edited by you to suit your product. This is also the link text that is shown when the product is found on google.
- Meta Keywords - You can put any relevant keywords for your product in here.
- Meta Description - Should be descriptive and interesting to get people to click through to your product.
This is the text shown below the title link in a google search. Dont make it too long, it should be around 150-160 characters.

Related products, Cross Sells and Up-sells.
Here is where you can link with other products you have uploaded, you can choose any of these categories and add products that you want to display as links on the product pages.
It only shows you options for your products so the more you list the more you can link.

The final section is Downloadable information
This is where you will define and upload your zip file containing your model.
Click the add link button.
In the titla box put your model name, this is the name that people will see as the download link in their download list.
Then you click on 'Browse Files' button and select your zip file. once it has uploaded the name of the zip file will be displayed above the browse files button.
Then you are ready to save your product and submit it for review.

And that is it, you have now listed your product. We will review your product and make sure that everything is in order and that the files match the product listing.
Once it has been reviewed you will recieve a message letting you know if it has been accepted or informing you of what changes need to be made if it is not accepted.
Once the item is live it will appear in the catalogue and able to be sold, you can link to your product and post that link on social media or blogs to drum up costomers.
The product will also appear on our advertising campaigns and be promoted to our customers.
It will also appear in the new products section on the ront page and the new products pages.
If you need any support in this process then feel free to get in touch with us or join our discord and we will be able to help you out and ensure that you make the most of your listings.
Good Luck
Recent Posts


Popular Posts


