We use cookies to make your experience better.
To comply with the new e-Privacy directive, you agree to the privacy policy and our use of cookies.
Amy Daggetts Stargrave Project
January 02, 2023
The Ultimate Stargrave board
By Amy Dagget
For all you people that are members of and been paying attention to The Digital Taxidermists facebook group lately you will have seen the images of Amy Daggett’s Stargrave project.
Amy has been preparing her table for her first outings into the Stargrave universe now for the last couple of months. We have been lucky enough to see the results of her work as she completes various Digital Taxidermy models. She has also kindly included some painting guide information for most of the
The first building that we saw come off the line was our Future house, This was one of our early models and it was really brought to life with a simple clean paint job that was given a huge amount of depth and character when it came to the weathering and rust on the metallic parts.

Future House:
- I primed with flat black waited for it to dry, then painted base coat of flat gray
- The roof was painted with the Krylon Colormaxx Red Oxide Primer paint first
- I used a mixture of my "rusty" colors and black washes to get the aged look on the roof and on the details of the house
- I then painted the interior and exterior walls with an off white/grayish blend of Army Painter paints
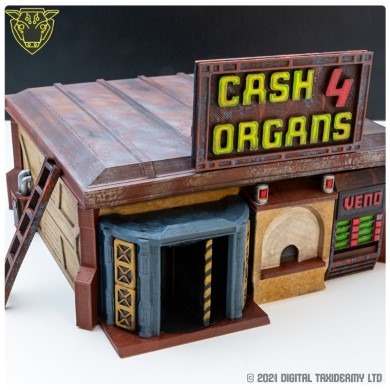
Next, we were treated to the birth of the downtown area with Cash 4 Organs, and we were blown away with the clinical finish on the internals and the amazing rust effects on the roof and exterior fittings, It really brought out the setting and function of the building within the setting.
The effects of the neon lights on the sign really made it stand out and make it highly visible and the addition of anatomical posters, computer readouts and other easter eggs scattered around helps give it a homely feel.
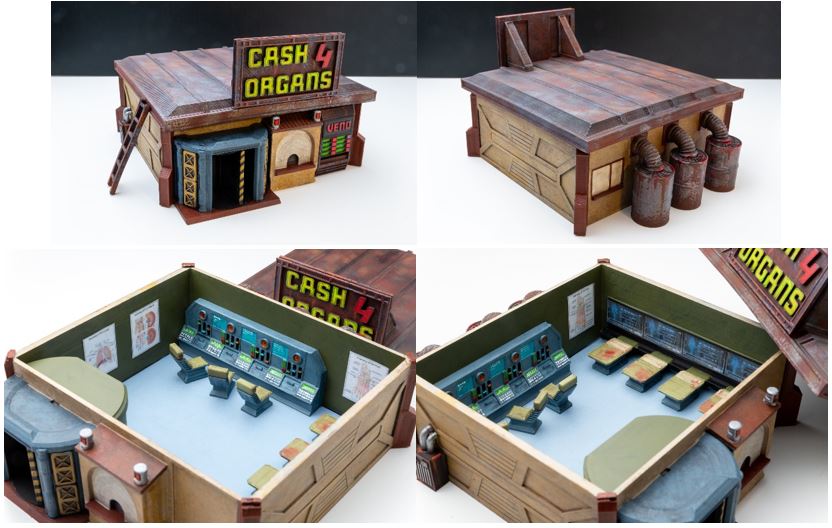
Cash 4 Organs building:
- Started with a coat of Rustoleum 2X flat black
- then one coat of the Krylon colormaxx Red Oxide Primer paint
- then splatter sprayed with Rustoleum 2X Flat gray primer
- Once it all dried I painted the exterior walls with Army Painter's Desert Yellow
- I then painted the rusty building corners, back rusty panels and front walk with a mixture of Army Painter's Dragon Red, Dry Rust, & Matt Black
- The front entryway I added a mixture of Army Painter's Wolf Grey and tiny bit of Matt Black
Cash 4 Organs Rooftop:
- Started with a coat of Krylon Colormaxx Red Oxide Primer Paint
- Dry brushed a rusty effect with Army Painter's Chain Metal with Matt Black - let dry
- Dry brushed another mixture of the 3-paint rusty mix
- then finished off with a wet wash of really runny matt black to make it look aged
- The sign was painted the same way except that I used a bright yellow, green and red for the neon effects then washed it with some strong tone wash effects
Cash 4 Organs Interior:
- I painted the walls first with Army painter Venom Wyrm and the floors second with Ice Storm. No washes necessary for the walls or floor.
- The beds and chairs were all painted the same way with Army Painter Wolf Grey on the bottoms with a blue toned wash and an army green surface with a dark tone wash on top
- I added a little glistening blood for realistic effect to the beds. and finished all the surfaces with a slight wash for "dirty" effects
- I found some cool royalty free imagery on Google for the posters and the biomonitor screens
But it didn’t stop there, shortly after this we were treated to the completed work on the power sub-station from our Proxigenator’s Fabricatum Kickstarter. This utility building was given a very functional paintjob in an olive drab, The details picked out nicely to give you something to see all over the model and the weathering gives it that lived in feel that any well used industrial building should have.

Things then started to go to a more industrial/military theme now as the next items came off the line and we saw some more items from our Dystopian Future Kickstarter, this was the beginnings of a warehousing compound which could be for commercial or military use. It uses the hangar, compound walls, pavements, vending machines, other scatter and also the shipping containers.
The hanger had a very clean paint job with some shading and stippling to give it a depth of colour and it details picked out nicely to draw the eye to them. The walls were really well done with a metallic look and depth added with stippling techniques and weathered nicely to give it some age and wear.
Then the scatter has been rusted and weathered like crazy to give it a real dystopian feel. These really come together to create a really atmospheric setup when all laid out together and make a nice battle zone by themselves.
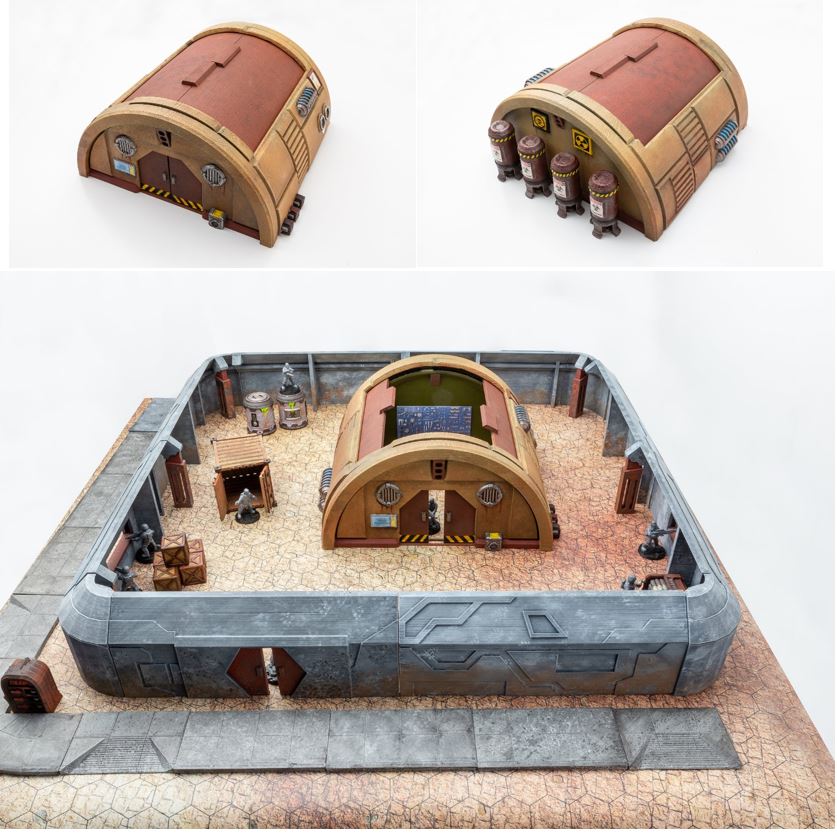
Space Hangar Building:
- Started with a coat of Rustoleum 2X flat black
- Let dry then added Krylon Fusion Textured Raw Clay to just the exterior of the Hangar
- I then painted the rusty roof with my rusty mixture of Army Painter Paints
- I put a light wash of the rust and some dark tones to the exterior of the building and let them dry.
- The interior was painted with Army Painter's Cultist Robe color and I added a wall of tools to decorate the blank wall
- The exterior was then detailed with some colors for signage and metals for the "power modules" attached to the hangar
- I painted the cannisters on the reverse side of the building with the Krylon Colormaxx Red Oxide Primer as a base
- I then used the same rust effects that I used on the roof of Cash 4 Organs to paint the cannisters, adding black and safety yellow to add interest to them.
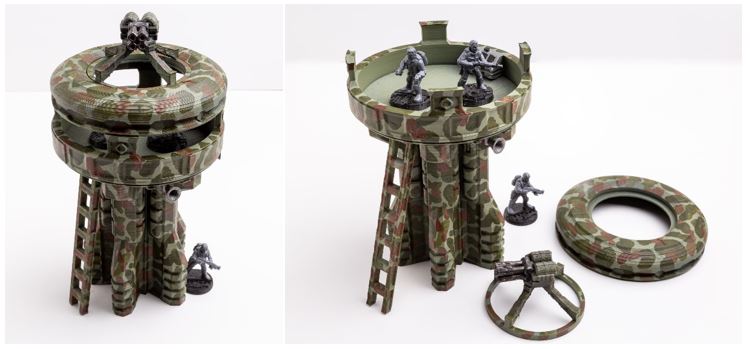
The compound was then topped off with a guard tower to keep out the riff raff and this time a camo colouration was used, which we all know makes everything hidden….so look closely or you might miss it.
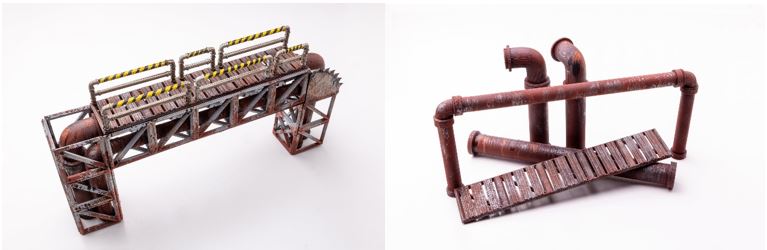
And the industrial areas were expanded with the pipes and girders set, well weathered and rusted as any good abandoned industrial zone should be they are full of character again and the hazard markings on the railings are a really nice touch.
Next up in a shrewd move she claimed the objective markers and was the first to share her work on those with the class. The lava type bases adding some extra vibrant colour to them.
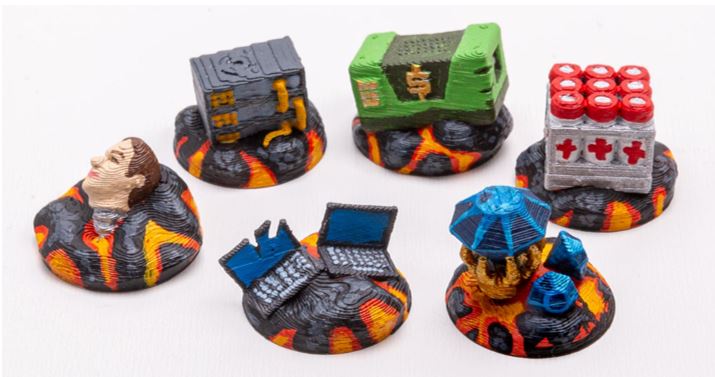
Those loot tokens were given away as a promotion for The Wreckage of the Star-freighter, Amy was also a supporter of that Kickstarter and the first to get some pictures of completed sections from that set.
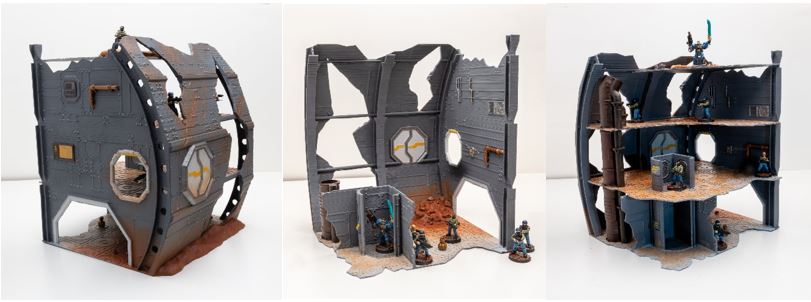
Theses hulking pieces will tower above anything else on the battlefield and once again she has done some stunning work in bringing them to life, the colour transitions around the rubble and on the floors gives a real dusty feel, calling to mind a desert or Martian wasteland, a simple choice of colours and highlighting of details helps to break up the metal tones and show off the little features.
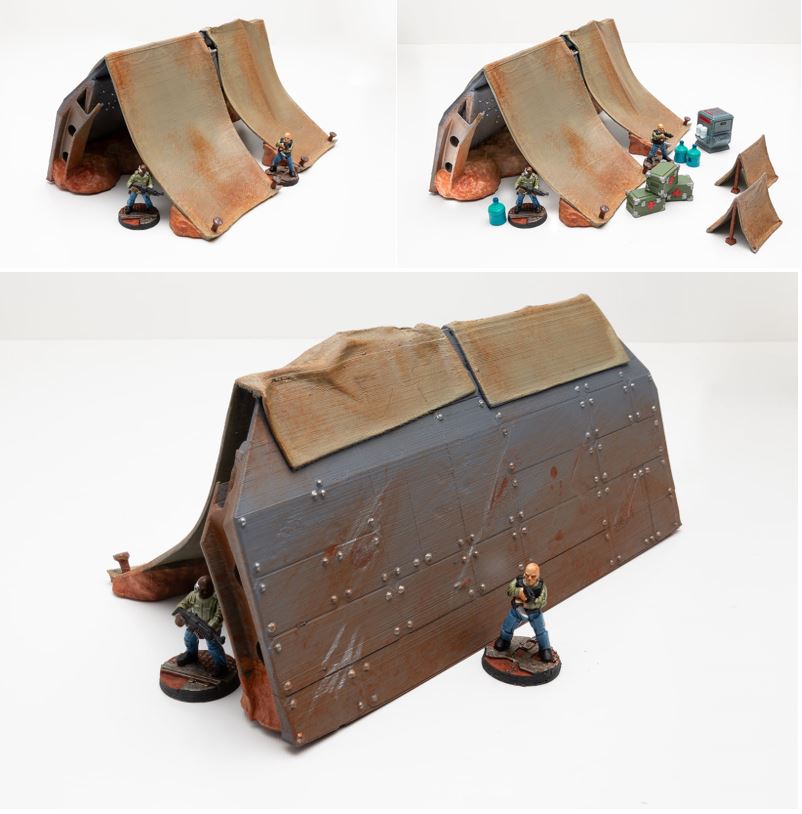
And finally, we have from the Wrecked Star-freighter set the base camp section and it scatter items. This looks absolutely stunning and the tones on the canvass really give it a dusty and windswept feel and once again we see some attention to detail on the metal work that add great depths of colour and weathering.
All in all, this work is building up to an outstanding set of terrain and will be perfect for starting off her journey into Stargrave. We look forward to seeing more from Amy as she builds out her dystopian future and can’t wait to see what the final tables look like.
If you want to see more of our patrons work, then pop across to The Digital Taxidermists facebook group to keep up with the latest and possibly share some of your own projects. We love to see what you are doing and get some feedback on our designs.
Recent Posts


Popular Posts


